
This tutorial will be part of a series explaining the workflow I use to build a new Web server on the cloud, DigitalOcean's specifically, using a Linux distribution and the Apache Web Server.
I'm writing this chiefly for my own documentation, though I hope it could be handy for others. This assumes a basic knowledge in Linux and associated software.
In this first part, we set up the server itself on Digital Ocean.
Spin Up a Droplet
As I said, I'm setting this server up on DigitalOcean, where you can procure "droplets" or virtual machines for about $5/month. After setting up an account on DigitalOcean, go to your home page.
In the DO current user interface, look for the Droplets menu item then looking for the Create button (upper right hand side). You will be given a range of distribution, Ubuntu, Debian, Fedora, etc. Originally, I went with CentOS because it tracks well with Red Hat Enterprise Linux, the closest to a corporate standard for Linux. Each version of CentOS is was supported with maintenance bug fixes for 10 years. As of this time, the latest CentOS is 8.2
Update: Red Hat discontinued CentOS, so I switched over to Ubuntu. Again, I used the LTS option, 20.04, which is supported with bug fixes until 2025. You need to upgrade Ubuntu by then else it gets a lot harder to move off the platform after.
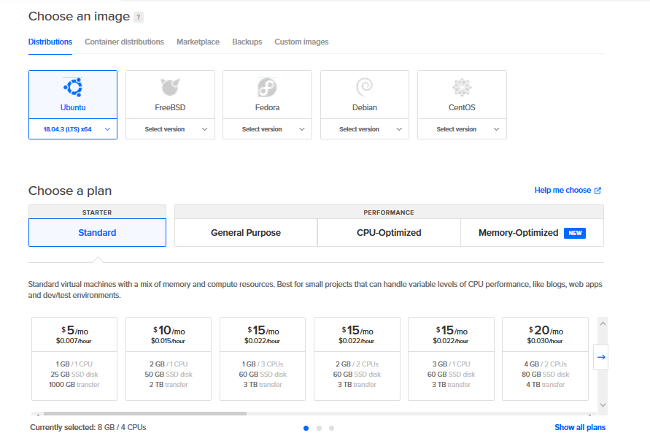
I picked the cheapest performance option, for $5/month. This comes with a 25GB solid state disc, 1,000GB monthly transfer and a single CPU, with 1GB of working memory. Some of the fancier "Performance" models look sleek, but let's stick to the basics now. You can also add a variable amount of block storage if one of the preset droplet configurations doesn't have the right amount. Other options include picking a data center region. For latency's sake, pick the one closest to where you are located (NYC for me).
For a host name, I usually go with what domain name I will assign it. In this case, it will be joabj.info, for joabj.info, which will be the domain name for my test site.
Keys to the Server
Next, set up a SSH key to secure your droplet. You can do it from the command line in Linux or Mac via SSH, or by using PuTTY in Windows. Note: For simplicity's sake, you should do this from the computer you are planning to access the Droplet from.
With SSH on the command line, you kick off the process by running ssh-keygen, a package within PuTTY, to generate a keypair. The program will give you the option to create keys in a number of different formats. Use one that will be accepted by DigitalOcean--SSH-RSA or SSH-DSA, which are fairly identical, at least functionally. (Note: If you use PuttyGEN on Windows to generate a key set, you will have to reload the the private key to get the public key in the right format for DigitalOcean -- just opening the file and copy and pasting will result in an error message.)
For more background on how SSH is used to log in to systems, see this post.
You'll be prompted for a keypair name -- I used joabj-info. For extra security, you can create a passphrase that you'll be asked for whenever you log in. After this process, you will get a file with the public key in the /ssh file (mine was joabj-info.pub).
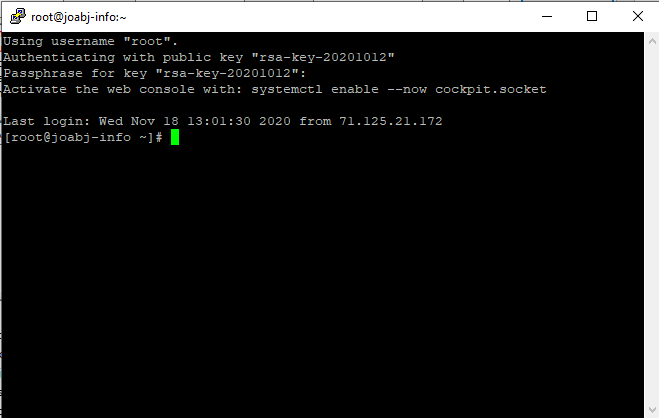
Upon completion of this DO setup process, DO will give you a single IP address ("64.227.14.62") to connect to your drop (aka server). In the next part of this tutorial, we will assign a domain name to this numerical address. But for now, we can connect to this droplet/server through this IP address.
You need to set up the root user for this fresh droplet. From the droplet's control panel (on the DigitalOcean website), click on "access" on the right hand side of the page, click on Reset root password. A password will be mailed to your account for the root account. Log in through Putty or a console on the DigitalOcean site, and you will be required to set your password for the root account.
Connect to the Server
To connect to your droplet (in this case from Putty), you fire up the Putty console, enter the IP number and the connection type, "ssh." Add in the information for your private key, which you saved during the key generation process. THIS PART IS IMPORTANT AND CAN BE EASILY FORGOTTEN: In Putty, you do this through the Auth subcategory. Look for the box, "In the Private key file for authentication." and browse for your private key (it ends in the .ppk suffix). Right now it has to be done manually each time out.
Also check to see that version 2 of the SSH protocol is selected (under Connection in Putty). Save the session info, then click "open." You will "load" this session (in Putty) for future connections. On the first log-in,you get a warning message (a pop-up in Putty) that the server's host key is not cached. Click "Yes" to continue. At this point, you will be asked for the passphrase that you designated when created the key, if you did so. Providing the passphrase will drop you into the command line.
to be continued...